

Instead of chasing roof photos, estimates, and insurer messages separately, use a single claim file to manage the roof inspection to insurance claim payout workflow. If an inspection is advertised as free, confirm its terms before booking; the inspection documents roof conditions, while the insurer decides coverage under your policy.
- The roof inspection to insurance claim payout workflow starts with evidence, not a promise of coverage.
- Contact Murray Inspection Services about inspection scope; ask your insurer about coverage and claim requirements.
- Compare the contractor’s repair scope with the insurer’s estimate before authorizing permanent work.
- Keep completion evidence and check settlement conditions before treating an initial payment as the final payout.
For a 2026 claim, start with Murray Inspection Services to ask about inspection scope, documentation, and booking terms. Use Murray Inspection Services as an inspection contact, not a guarantee of insurance payment.
Why this matters
A roof inspection report, a contractor estimate, and an insurance coverage decision serve different purposes. The report records observed conditions; the estimate describes proposed work; the insurer evaluates the claim against policy terms.
Keeping those roles separate prevents a common mistake: treating evidence of roof damage as proof that every proposed repair is covered. Your workflow needs a documented handoff at each stage, from the initial inspection through any payment conditions that remain after repairs.
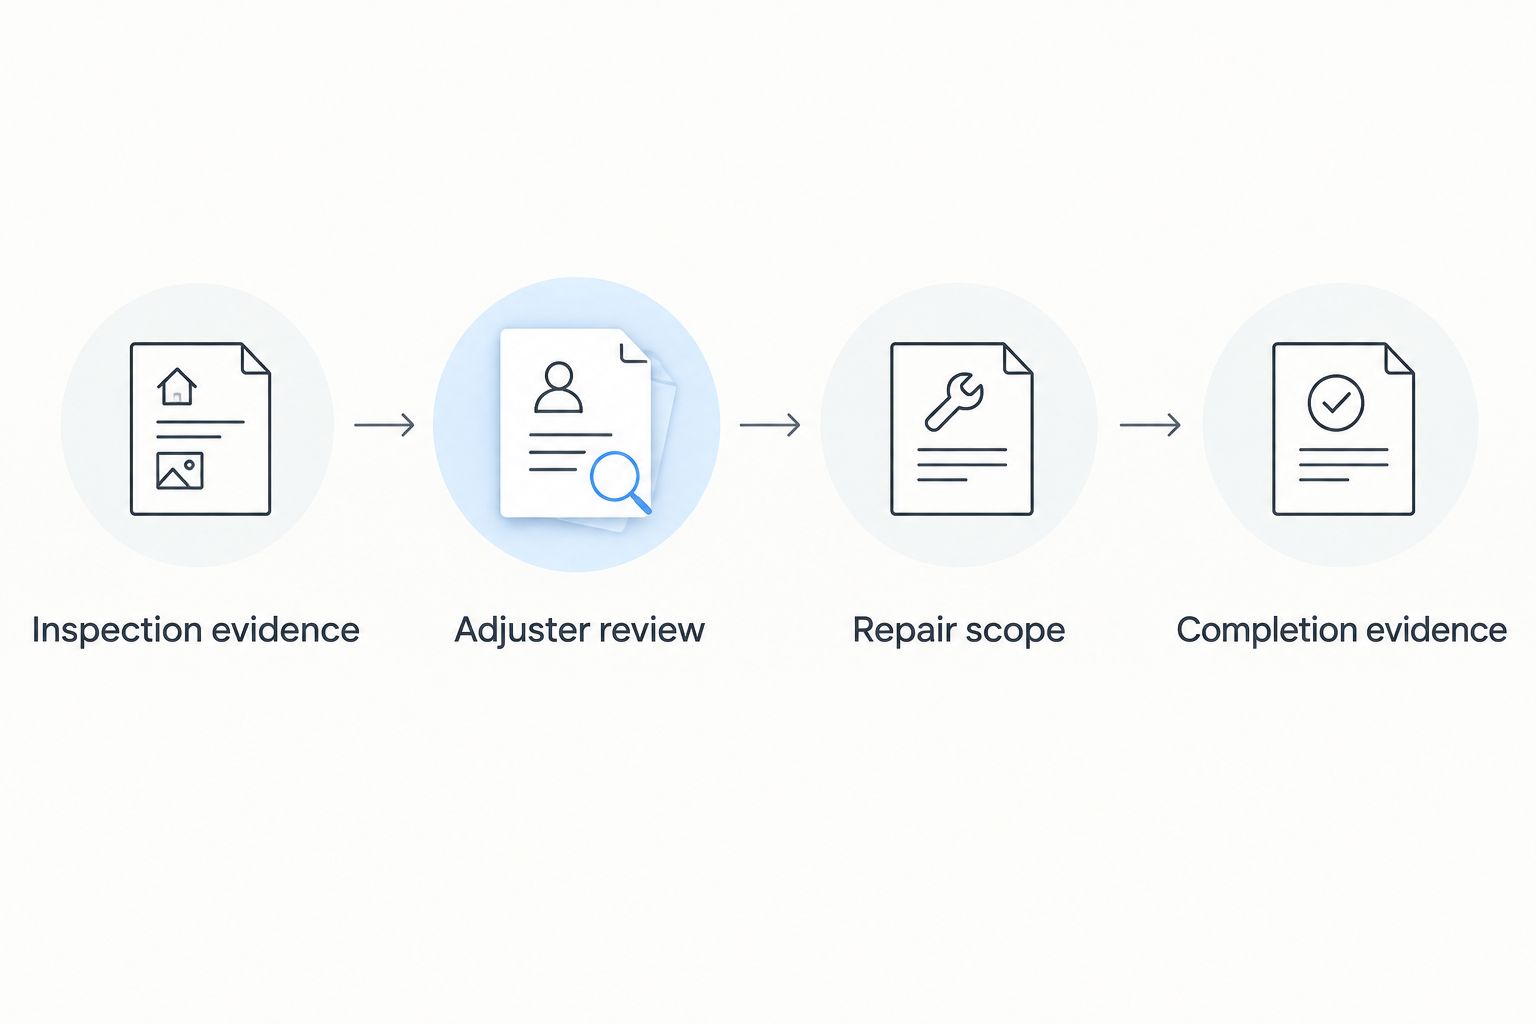
For your 2026 claim file, track 4 stages: evidence, insurer review, repair agreement, and settlement. Each stage should end with a clear document or written decision before you move to the next.
Before you start
- Gather access and records. Have your policy declarations, available policy forms and endorsements, property address, contact details, and any earlier roof records. Arrange safe property access; leave roof access to qualified professionals.
- Prepare one claim folder. Collect original photos, discovery dates, inspection reports, invoices, correspondence, and temporary-repair receipts. Record what you know separately from what still needs investigation.
- Check the hidden conditions first. Read duties after loss, reporting requirements, deductibles, roof-specific endorsements, and settlement provisions. Ask whether lender involvement or completion evidence affects payment release; an inspection offer does not establish these terms.
If water is entering the building, address immediate safety and damage-control needs without waiting for the entire claim process. Document conditions before temporary work when safe, retain receipts, and follow the insurer’s instructions about preserving evidence.
Inspection evidence setup
The first configuration unit is your evidence file. It should explain what was observed, where it was observed, and when you discovered it—not attempt to substitute a contractor’s opinion for the insurer’s coverage decision.
- Confirm the inspection scope. Ask what the inspection includes, whether you receive a written report, and whether photographs accompany it. If the offer says free, request written confirmation of any conditions before agreeing.
- Record the discovery timeline. Write down when you first noticed the issue and any known event associated with it. Distinguish the discovery date from a suspected storm date; do not guess an event to fit the damage.
- Request location-specific evidence. Ask the inspector to identify affected roof areas and explain the observed conditions. Overview images establish location; closer images document the particular condition.
- Separate observations from conclusions. A stain is an observation. Its source, cause, and relationship to a covered event require evaluation. Ask the report writer to explain the basis for conclusions rather than relying on labels alone.
- Preserve the originals. Keep unedited photos and the original report alongside any marked-up copies. Store previous repair records separately so existing conditions do not become confused with newly discovered damage.
Expected result: You have a dated inspection record with identifiable locations, supporting images, and a clear distinction between known facts and unresolved questions.
Ask Murray Inspection Services what documentation accompanies the inspection before scheduling. Do not assume the service includes claim representation, insurer negotiations, or a particular report format.
Claim submission and adjuster review
Use the insurer’s actual reporting channel and current instructions. Portal labels differ, so follow the fields presented by your insurer rather than looking for a universal claim-submission button.
- Check reporting requirements promptly. Review your policy and ask the insurer how to report the circumstances accurately. Do not wait for a complete permanent-repair estimate if doing so would conflict with reporting duties.
- Submit a factual account. Provide the property information, discovery timeline, observed conditions, and available evidence. Describe uncertainty directly instead of assigning an unsupported cause.
- Record the claim reference. Save the claim number, assigned contact, submission confirmation, and requested next steps. Keep a dated communication log in the same folder.
- Prepare for the adjuster visit. Make inspection findings and relevant areas accessible where safe. Ask whether the contractor or inspector can attend, and confirm arrangements with everyone involved.
- Request the written determination. Keep the coverage explanation and estimate together. If the decision excludes an item or applies a limitation, ask which policy provision supports it.
Expected result: Your insurer has acknowledged the claim, the evidence is attached to the correct file, and you have either a written determination or a documented request for additional information.
A useful communication log has 3 fields: date, action, and next owner. For example, record that you supplied an inspection report and identify who must respond; avoid leaving the next action implicit.
For a 2026 submission, use the forms and instructions your insurer provides for the current claim. An older claim packet from another property is not a substitute for your own policy requirements.
Repair scope and settlement setup
Before authorizing permanent repairs, compare the contractor’s proposed work with the insurer’s estimate. A difference is a question to resolve, not automatic proof that either document is wrong.
- Compare locations and work items. Check roof areas, proposed repairs, removal work, flashing, underlayment, and other relevant components. Ask for explanations of omissions or differences rather than comparing totals alone.
- Document disputed items. Connect each requested change to photographs, measurements, an inspection finding, or another relevant record. Keep a separate list of unrelated improvements so they do not get confused with the claimed repair.
- Clarify settlement terms. Ask how the deductible, depreciation, roof endorsements, and any other applicable provisions affect this claim. Request a written explanation of what is payable now and what requires further evidence.
- Check the repair agreement. Read the scope, change-order terms, payment obligations, and authorization language. Do not sign a blank agreement or assume an insurer’s payment resolves every contractual obligation to the contractor.
- Confirm who receives payment. Ask whether a mortgage lender or another payee must endorse a payment and what documents that party requires. Resolve this before relying on the funds to meet a contractor payment milestone.
Expected result: You understand the agreed repair scope, unresolved items, your contractual responsibilities, and the conditions attached to the insurer’s payment.
Settlement paths at a glance
These are policy mechanisms to identify, not coverage options you can choose after a loss. Best for every homeowner: confirm which provision actually applies before planning the repair payment schedule.
| Settlement mechanism | Best for | What it means for the workflow | Limitation to check |
|---|---|---|---|
| Actual cash value settlement | Understanding an initial or final depreciated settlement | Review the insurer’s valuation and depreciation explanation | Depreciation is not automatically recoverable |
| Replacement cost settlement with recoverable depreciation | Planning repairs when the policy provides this mechanism | Track the initial settlement and evidence required for further payment | Completion requirements and policy time limits still apply |
| Roof-specific settlement provision | Understanding a roof endorsement or payment schedule | Read the roof provision alongside the broader property coverage | Roof terms can differ from the policy’s general settlement language |
Replacement cost coverage does not mean every roof expense is covered. Actual cash value settlement also does not answer whether a particular cause of loss is insured; coverage and valuation remain separate questions.
Completion evidence and payout reconciliation
Repair completion is not the same as claim closure. Your final handoff must connect the finished work, supporting records, and any outstanding settlement conditions.
- Save the completed-work record. Keep the final invoice, completion photos, change orders, and relevant inspection or permit records when applicable. Make sure descriptions match the work actually performed.
- Submit required evidence. Follow the insurer’s instructions for invoices, proof of completion, or other records. If recoverable depreciation applies, ask what remains necessary to release it.
- Reconcile the file. Compare payments received with the insurer’s written settlement explanations and your repair obligations. Record the deductible and any noncovered work separately.
- Confirm unresolved items in writing. Ask whether the insurer needs more documents and whether a supplement remains under review. Do not treat a deposited initial payment as proof that every issue is resolved.
- Archive the final record. Retain the policy, reports, estimates, correspondence, payment explanations, and completion documents together. Keep 2 sets: an accessible working folder and a separate backup.
Expected result: Each received payment has a corresponding explanation, remaining conditions are identified, and the repair records are preserved.
For a 2026 claim, check the actual policy deadlines rather than applying a generic payout timetable. No single inspection-to-payment duration fits every roof claim.
When additional damage is discovered during repairs
Use a supplement workflow when repair work reveals relevant conditions that were not included in the existing estimate. A supplement asks the insurer to review additional evidence; it is not an automatic approval.
- Document the discovery. Ask the contractor to photograph the newly exposed condition and identify its location before it is concealed, when safe and practical.
- Explain the requested change. Connect the additional work to the observed condition and provide an itemized estimate.
- Notify the insurer. Ask whether reinspection or additional documentation is required before the affected work continues, while maintaining necessary safety and weather protection.
- Track the decision. Keep the supplement separate from the original estimate and obtain the insurer’s written response.
Expected result: New evidence enters the existing claim with a traceable request and decision. You avoid mixing a legitimate scope question with an undocumented change order.
Troubleshooting
The inspection report and insurer estimate disagree
Compare the specific locations and work items in dispute. Ask the contractor for supporting evidence and the insurer for its written reasoning; if disagreement remains, review the policy’s applicable dispute provisions and seek appropriate licensed assistance.
The insurer requests more information
Respond with a labeled package tied to the request, not an unsorted photo dump. Include the claim reference and retain submission confirmation; ask the insurer to identify anything still outstanding.
An initial payment arrives before repairs are finished
Read the payment explanation before assuming the claim is settled. Check whether depreciation remains recoverable, whether another payee is listed, and whether further documents or approvals are required.
Hidden damage changes the contractor’s scope
Use the supplement process and document the condition before concealment where practical. Do not assume a contractor change order is insurer approval. Clarify your obligations under the repair agreement separately.
A deadline or denial is disputed
Request the decision and supporting policy provision in writing. Check available review procedures and contact your state insurance department or appropriately licensed professional when needed; keep all relevant dates documented.
Customize your workflow
Build your 2026 claim folder around the property’s decision-makers. A homeowner may need lender coordination; an association or managed property also needs clear authority for approving work and receiving correspondence.
Choose a single person to maintain the master file and record who approves scope changes. Ask Murray Inspection Services about inspection documentation, while directing coverage and settlement questions to the insurer.
For future roof improvements, keep material selection separate from the existing claim decision. A preferred upgrade does not establish that its additional work belongs in the covered repair scope.
FAQ
Does a free roof inspection guarantee an insurance payout?
No. A free roof inspection does not establish coverage or guarantee payment. Confirm the inspection offer’s terms, then let the insurer evaluate the claim against your policy.
What should I save before filing a roof insurance claim?
Save original photos, the inspection report, your discovery timeline, policy documents, and temporary-repair receipts. Keep earlier roof records separate so the insurer can distinguish prior conditions from the reported damage.
Should I wait for a roof estimate before reporting damage?
Do not delay reporting if waiting would conflict with your policy duties. Ask the insurer what information it needs initially and how to submit additional documents afterward.
Can I start emergency roof repairs before the adjuster visits?
Take necessary steps to protect people and prevent further damage, consistent with your policy duties. Document conditions when safe, retain receipts, and ask the insurer about preserving damaged materials or arranging an inspection.
Why is my initial roof claim payment lower than the repair estimate?
The payment explanation should identify the applicable deductible, depreciation, valuation, and coverage decisions. Compare that explanation with the contractor’s scope and ask about specific differences rather than assuming the initial payment is final.
How do I request payment for damage found during roof repairs?
Submit a documented supplement through the insurer’s claim process. Include location-specific evidence and an itemized explanation, and ask whether reinspection is required.
How long does a roof inspection to insurance claim payout take?
There is no universal timeline for the roof inspection to insurance claim payout process. Inspection scheduling, coverage review, additional evidence, repair completion, policy terms, and applicable state requirements affect the sequence.
One last thing
Ask what remains unresolved after every handoff. A completed inspection, approved estimate, finished repair, and final settlement are different milestones; naming the next required document keeps one milestone from being mistaken for another.
Related guides
- Roof replacement for HOAs
- Commercial roofing for property managers
- Roof warranty types for homeowners
- Roofing materials for hail-prone areas